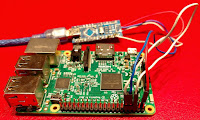
I used the Raspberry as development platform, but you can cross-compile if you want.
Operative System:
I used Minibian, a reduced Debian Linux (no GUI), in order to get it visit https://minibianpi.wordpress.com/
To get an AMP environment we need to boot Linux with at most three cores and reserve one for bare-metal. Also RAM needs to be separated, i.e. lower 512 MB for OS and upper 512Mb for bare-metal.
Linux kernel accepts boot time parameters that can be used to force kernel to override the default hardware using.
With "maxcpus" and "mem" boot parms we will get the job done, but.... standard Raspberry Pi boot process involves GPU bootloader, ARM bootloader, and a config.txt with some possible configuration options (not really full compilant linux boot parameters). Setting maxcpus=3 and mem=512 in config.txt result in a system boot with 3 active cores, but very inestable, even it crash with ethernet cable connected. And the "mem" parameter has no effect (Linux gets all RAM).
Here comes U-Boot to help us,
Bootloader:
Following step is based on Tim's post about "Booting a Raspberry Pi2, with u-boot and HYP enabled"
NOTE; Last updates are mandatory for Raspberry Pi 3!! Be sure to do:
apt-get install rpi-update
rpi-update
U-boot is a flexible bootloader intended for embedded systems. Clone and compile it:
git clone git://git.denx.de/u-boot.git
cd u-boot
make rpi_2_defconfig
make all
Copy u-boot.bin to your SD and change config.txt to read:
kernel=u-boot.bin
 |
| Using CH340 from ex-arduino nano |
setenv machid 0x00000c42
setenv bootargs= earlyprintk console=tty0 console=ttyAM0 root=/dev/mmcblk0p2 rootfstype=ext4 rootwait noinitrd mem=512M maxcpus=3
saveenv
Create a boot.sc.source file containing:
fatload mmc 0:1 ${fdt_addr_r} bcm2710-rpi-3-b.dtb
fatload mmc 0:1 ${kernel_addr_r} kernel7.img
bootz ${kernel_addr_r} - ${fdt_addr_r}
And do:
mkimage -A arm -O linux -T script -C none -n boot.scr -d boot.scr.source boot.scr
Move the obtained boot.scr file to SD root.
+If you don't have a serial adapter you can get example files in the boot folder at the repository
Now Linux boots with 3 cores (draws only 3 berries during boot) and half memory (512Mb)
Test it with
free
cat /proc/cpuinfo
We have remaining hardware resources for simultaneous baremetal app run: AMP!
Read Step 2 for Bare Metal Coding
+If you have experience obtaining a Raspberry Pi uboot.env file from Linux with fw_setenv please let me know. This will avoid the serial adapter for succeeding bootargs mods.
I am facing this issue if I follow the process :
ResponderEliminarU-Boot 2016.09-rc2-00059-gff62bdf (Aug 29 2016 - 15:38:38 +0100)
DRAM: 948 MiB
RPI 3 Model B (0xa22082)
MMC: bcm2835_sdhci: 0
reading uboot.env
In: serial
Out: lcd
Err: lcd
Net: Net Initialization Skipped
No ethernet found.
starting USB...
USB0: Core Release: 2.80a
scanning bus 0 for devices... 3 USB Device(s) found
scanning usb for storage devices... 0 Storage Device(s) found
scanning usb for ethernet devices... 1 Ethernet Device(s) found
Hit any key to stop autoboot: 0
switch to partitions #0, OK
mmc0 is current device
Scanning mmc 0:1...
Found U-Boot script /boot.scr
reading /boot.scr
207 bytes read in 25 ms (7.8 KiB/s)
## Executing script at 02000000
reading bcm2710-rpi-3-b.dtb
17624 bytes read in 21 ms (819.3 KiB/s)
reading kernel7.img
4581064 bytes read in 376 ms (11.6 MiB/s)
Kernel image @ 0x1000000 [ 0x000000 - 0x45e6c8 ]
## Flattened Device Tree blob at 00000100
Booting using the fdt blob at 0x000100
reserving fdt memory region: addr=0 size=1000
Using Device Tree in place at 00000100, end 000075d7
Using machid 0xc42 from environment
Starting kernel ...